DIY Photography Floor & Backdrop for Truly Sweet Photography Studio {Georgia Wedding & Newborn BabyPhotographer}
Hey y’all!! Hope you’re having a fantastic Friday!! Today’s blog is a “How to DIY” - floor drop & backdrop. Here I am in front of it this afternoon!!
So, if you haven’t heard, Truly Sweet Photography is getting a brand new in-home studio!! We started out in the dining room, which was great, but we've outgrown it!! WOOHOO!!! So, we are turning our “Basement Clubhouse”/office (We call it our basement, but it is just a single bedroom that is on the ground/terrace level) into Truly Sweet Photography studio. I am so stinking excited!!!
Well, I’m not going to lie my first hesitation with moving the studio was that the “Basement Clubhouse” was carpeted and I didn't have any floor drops, and the paper just DOES NOT WORK on shag carpet. ;o) Suddenly, I remembered that my husband, Scott, had won a Lowes gift card worth $60 that we hadn't used yet. After searching out the floating wood floor that best suited my taste I quickly realized $60 wasn't enough to cover even just the floor. Not to mention any other supplies I might need. OH, and did I mention I don’t own much more than a women’s tool kit and my husband has an electric drill… No saw to cut the wood to fit the 4’x4’ area I was looking to cover. But, again, I needed flooring. So…. With my 16 month old, Dawson, in his Baby Bjorn carrier I ventured out to Lowes.
When I went back to the flooring section a “Clearance” sign in the middle of an odd aisle caught my attention. Being a glass-full kind of girl I perused the Clearance section in hopes of finding the exact flooring I was seeking out. Well, to my dismay they didn’t have it. But, they did have these 2 boxes of vinyl flooring that was all rolled up. It looked like 3’ long planks end to end that already had the sticky back and you just cute it with a box cutter (Which I have in my handy dandy women’s tool kit!!) Then I saw the price was $6.96. Of course my mouth dropped, because each box was more than enough to cover a 4’x4’ area. So I thought, “HEY!! I could have a faux wood backdrop & a floordrop for a quarter of what the floating floor would cost.” So, I was all over that like white on rice!!
I then made a B-line for lumber in search of some kind of wood to stick this vinyl flooring to. That’s where Jim, the Lowes lumber guy, directed me to the MDF boards. The MDF boards would work, but they are SUPER thick and much heavier than I had anticipated. Then I saw the Pegboard and Jim mentioned it was already cut to the size I was looking for, 4’x4’!! It was like Jim , the Lowes lumber guy, introduced my vinyl flooring to it’s soul mate!!! (Thank you, Jim!!)
Then I came home and put it together in about 20 minutes while critiquing American Idol!!! Here are some photos and instructions to help you do this same flooring yourself…
If you're like me you are probably thinking I'm half crazy and that there's no way this could work as a legit floor... Well, friends, not only does it work, but I've been using them for over a year now!! LOVE THEM!!! There are some examples of recent newborn baby photos I've taken using the floor drop in my Truly Sweet {baby} gallery. You should check them out!!
What do you need?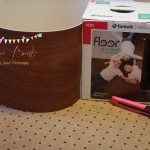 Peg Board -You will need a peg board the size of the area you would like to cover. I chose 4x4 because I cater to babies and kids in my studio.
Vinyl Flooring – If you are doing 4’x4’ like me you will need about 17’ (1 foot extra just in case you mess up and it’s always nice to have more than enough rather than running short!!)
Box Cutter – Which, if you have a tool kit, you’ll have one!! (If you have a ladies tool kit you’ll have a pink one!!)
How to do it –
I turned the peg board so it was smooth side up. Then I measured out the length I would need, making sure to line the long side to the edge of the peg board. Then cut it using the box cutter. Careful not to cut your carpet underneath!!(Side note – make sure you leave a little extra on each end. I was short on the very first board. After that I left an extra ¼” on each end and didn’t have another problem with the length.) After cutting the 1st length I needed I pushed that first “board” to the farthest part of the peg board and cut another. I did this until the board was covered. From there I alternated the boards and turned some upside down. This made it look more realistic. Once I had the pattern I liked I started sticking them to the board.
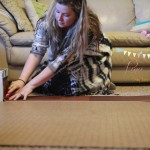
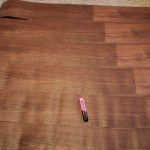 You take about 2 feet of the backing off and stick the “board” onto the peg board making sure to line it up with the long side. Next use the side of your box cutter (with your blade safely inside) to smooth the vinyl down. Make sure the edges line up. If they don’t, just lift it up and stick it back on the peg board correctly.
Once that first 2 feet is stuck on the peg board, peel the next foot and repeat until you have the whole 1st “board” stuck to the peg board. Next you start on the 2nd “board”…peel the first 2 feet again. This time make sure the long side of the “board” is flush with the first “board”. Then finish the rest of the peg board just like the 1st “board”. Continue to do this until you cover all of the peg board. My last “board” was about 4” too wide. So, after I stuck it to the peg board I turned over the covered peg board and cut the excess. I then made sure all the edges were trimmed until they were flush with the peg board… That’s it!!
You just took 20 minutes and made yourself a faux wood floor drop!! Here are some photos I took with it. Doesn’t it look great?!? Just to give you an idea of size, that is an apple crate with the fringe filler.
Pretty fantastic, huh?!? Easy, and cheap and GREAT for pictures!!
Cheers!!
Renee

![]()
 Peg Board -You will need a peg board the size of the area you would like to cover. I chose 4x4 because I cater to babies and kids in my studio.
Vinyl Flooring – If you are doing 4’x4’ like me you will need about 17’ (1 foot extra just in case you mess up and it’s always nice to have more than enough rather than running short!!)
Box Cutter – Which, if you have a tool kit, you’ll have one!! (If you have a ladies tool kit you’ll have a pink one!!)
How to do it –
I turned the peg board so it was smooth side up. Then I measured out the length I would need, making sure to line the long side to the edge of the peg board. Then cut it using the box cutter. Careful not to cut your carpet underneath!!(Side note – make sure you leave a little extra on each end. I was short on the very first board. After that I left an extra ¼” on each end and didn’t have another problem with the length.) After cutting the 1st length I needed I pushed that first “board” to the farthest part of the peg board and cut another. I did this until the board was covered. From there I alternated the boards and turned some upside down. This made it look more realistic. Once I had the pattern I liked I started sticking them to the board.
 You take about 2 feet of the backing off and stick the “board” onto the peg board making sure to line it up with the long side. Next use the side of your box cutter (with your blade safely inside) to smooth the vinyl down. Make sure the edges line up. If they don’t, just lift it up and stick it back on the peg board correctly.
Once that first 2 feet is stuck on the peg board, peel the next foot and repeat until you have the whole 1st “board” stuck to the peg board. Next you start on the 2nd “board”…peel the first 2 feet again. This time make sure the long side of the “board” is flush with the first “board”. Then finish the rest of the peg board just like the 1st “board”. Continue to do this until you cover all of the peg board. My last “board” was about 4” too wide. So, after I stuck it to the peg board I turned over the covered peg board and cut the excess. I then made sure all the edges were trimmed until they were flush with the peg board… That’s it!!
You just took 20 minutes and made yourself a faux wood floor drop!! Here are some photos I took with it. Doesn’t it look great?!? Just to give you an idea of size, that is an apple crate with the fringe filler.
Pretty fantastic, huh?!? Easy, and cheap and GREAT for pictures!!
Cheers!!
Renee



Leave a Reply