I am an avid DIY-er. I can't justify paying for something that I can do myself for a fraction of the cost. Plus I absolutely LOVE crafting!! There is something therapeutic for me about getting lost in a project. So, I was thinking about the newborns that I have on the schedule that will be born in the next couple months and decided I should make some more props. I checked out Etsy and the cheapest I could find 4 wraps was $27.00 (That includes shipping).

This is what the organically dyed newborn wraps looked like after dying them. I left one undyed to be able to compare the difference.
With that being said, I decided I wanted to make my own Cheesecloth Newborn & Maternity wraps (Which ended up costing me $5.00 and about 30 minutes.) This afternoon my husband, Mr. Truly Sweet, was headed to Wal-Mart so I had him grab a pack of the 6 yards of cheesecloth. Here's a link to the one he found in the craft section and purchased
www.walmart.com/ip/cheesecloth-6-yds/19757836
I was unable to do anything with the cheesecloth until after my 2 little Truly Sweets went to bed. (Evenings are my usual crafting time. However, not always a great time to start considering most stores are closed) So, I decided I wanted to turn the 6 yards into 5 wraps. I folded the fabric to make 5 even pieces and cut them. (Scientific, I know!!) That was Step 1. Everyone meet my helper tonight.

Everyone should have a crafting assistant. Mine just happens to be furry. She usually just sits near me and keeps me company (All the while admiring my crafts, I'm sure!!)
Next, I went looking through my cabinets to find things to dye the fabrics. I'm a big fan of the "Use what you've got because you've got what you need!!" mentality (And I'm a little bit of a hippie). I ended up using Teabags, Blackberries & Strawberries. But, the next time around I want to try red wine (I may or may not have a glass or 2 as I am crafting), Blue Kool-aid, Red Cabbage, Coffee & Brown Onion Skins. The great thing about using what you have in your house is it's all natural!! AND the strawberry dyed cheesecloth smells SOOOO good!! YUM!! Now that you've found what you are dying the fabric with, you have completed Step 2.
Step 3 Fill a mug up with water and microwave for about 30 seconds (You want it to be steaming hot).
Step 4 With Tea. Combine the hot water with the tea bags in a bowl (The more tea bags the more concentrated the color. Remember different tea bags will dye the cloth different colors). Once the water is nice and brownish orange add one of the cheese cloths. After 20 minutes ring it out completely and toss it in the dryer.
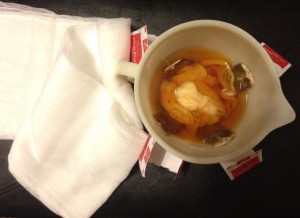
I put the undyed cheesecloth next to the tea dye so you could see the difference. I used 4 teabags, but the more you use the more concentrated the color will be.
Step 4 With Blackberries. So, I pureed the black berries and a little water which was perfect!! I wish I had a coffee filter to put the pureed black berries in to make sure the fabric didn't have little seeds and such on it, but alas I did not. I added the pureed berries and the mug of hot water in a bowl and put the cloth inside. Now I dyed 2 different pieces with blackberries. The 1st with just a little bit of the berries and hot water in 1 bowl and the rest of the berries in another bowl with hot water. That's how I got 2 different shades of that pretty purple!! After soaking for 20 minutes wring out the cloth and toss in the dryer Now if you didn't use a coffee filter to contain the blackberries don't worry. Once the fabric has been dried in the dryer just take it outside and shake it like a rug. All the dried berries fling right off.
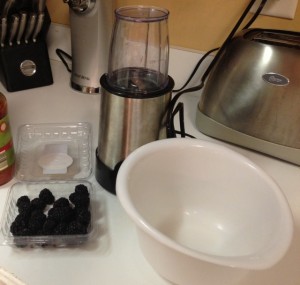
I only had about 1/2 a container of blackberries to work with.
Step 4 with Strawberries. Just like the black berries, I pureed the strawberries. This time I got a little smarter and poured the pureed strawberries into a strainer that was sitting on top of the bowl. Next I slowly poured the hot water over the the pureed strawberries. This helped to get the color out of the strawberries to die the cloth and there was very little berry or seeds in the bowl. After soaking for 20 minutes wring out the cloth and throw in the dryer.
-
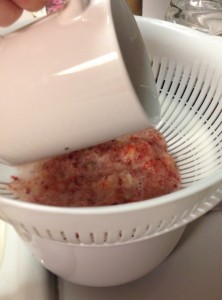
After slowly pouring the hot water over the strawberries there was little to no color left in the strainer. It was all in the bowl underneath.
After 20 minutes of soaking the cloths are done and need wrung out until there is no more water to squeeze out and just need dried.
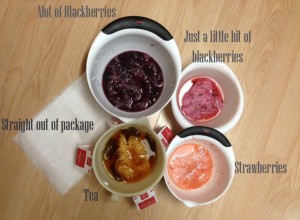
You can compare the colors of the different dyes here while the cheesecloth was soaking.
I put mine in the dryer on high cotton. I would recommend only drying until its just damp. Drying too much makes the fabric draw up and wrinkle. If you don't want to use your dryer just let the cloth air dry and then iron. Apparently the heat sets the color. After the cloth is dry if you decide the color is too light you are welcome to do it again. (So don't throw away the dye until you are satisfied with the color). Adversely, when you first pull the cloth out of the dye liquid, if you think the color is too dark just rinse with water to remove some of the color, wring out and then dry.
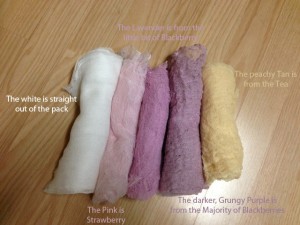
Here are all the cheesecloths I dyed and the description of what I used to dye them. I am a big fan of using the same color in 2 different shades, so I can't wait to use the 2 purples together!!!!
So, basically anything in your pantry or fridge that will stain a shirt should work to dye the cheesecloth. Some of the other ideas I had were to use jelly, food dye, egg dying kit, using mustard maybe even Oranges or the colored bubbles that say they will stain cloth. I'd love any suggestions you have on other foods (or condiments) that I could use in my next batch!! Happy crafting!!!
Cheers!!
Reneé


Leave a Reply to admin Cancel reply